Choosing between GPT Image 2.5 Flare and Sunburst starts with your creative goal. Are you exploring several visual directions, or refining an image where small changes matter?
Both models generate and edit images from text and image inputs.
Flare prioritizes fast, high-quality everyday creation.
Sunburst puts more emphasis on editing precision.
Understanding that distinction and the settings around it, can help you make more deliberate choices for your next image.
TL;DR: GPT Image 2.5 Flare and Sunburst
For quick creative exploration, start with Flare. Consider Sunburst when precise revisions and detailed requirements become the priority.
Model, quality, and image size are separate choices. Choose an output format that supports transparency when you need a reusable cutout or design asset.
Judge the result against your brief. On this website, both models currently use the same credits at each quality level, so focus on the requirements of your image.
Meet GPT Image 2.5 Flare and Sunburst
One model family, two creative priorities.
Flare and Sunburst belong to the GPT Image 2.5 family.
Both can create original visuals, work from reference images, and modify existing pictures. Their main distinction is the balance between generation speed and precision, rather than a split between generation and editing.
Comparison | GPT Image 2.5 Flare | GPT Image 2.5 Sunburst |
Main priority | Fast, high-quality everyday creation | Precise editing and demanding creative work |
Text and image inputs | Supported | Supported |
New images and edits | Both supported | Both supported |
Practical trade-off | Faster iteration | More emphasis on precision, with longer generation times |
GPT Image 2.5 Quality Settings: What Should You Choose?
Choose the rendering quality your image needs.
Both GPT Image 2.5 Flare and Sunburst support Low, Medium, High, XHigh, Max, and Auto. These settings control rendering quality, helping you balance visual detail, generation time, and resource use.
A higher setting is worth exploring when fine details matter, but it does not guarantee a better composition or a closer match to your creative brief.
Understand the Quality Levels
The following suggestions provide a practical starting point rather than fixed rules for every image.
Quality | Suggested Use |
Low | Explore concepts, check compositions, and test prompts. |
Medium | Start everyday projects and assess whether the result meets your needs. |
High | Refine a selected direction when finer visual detail matters. |
XHigh | Compare against High for particularly demanding images. |
Max | Try the highest available quality setting for critical final assets. |
Auto | Let the model select a quality setting based on your prompt. |
Auto is not a fixed middle setting. Choose an explicit level when you want a more controlled comparison between models or generations.
Image Quality Is Different from Resolution
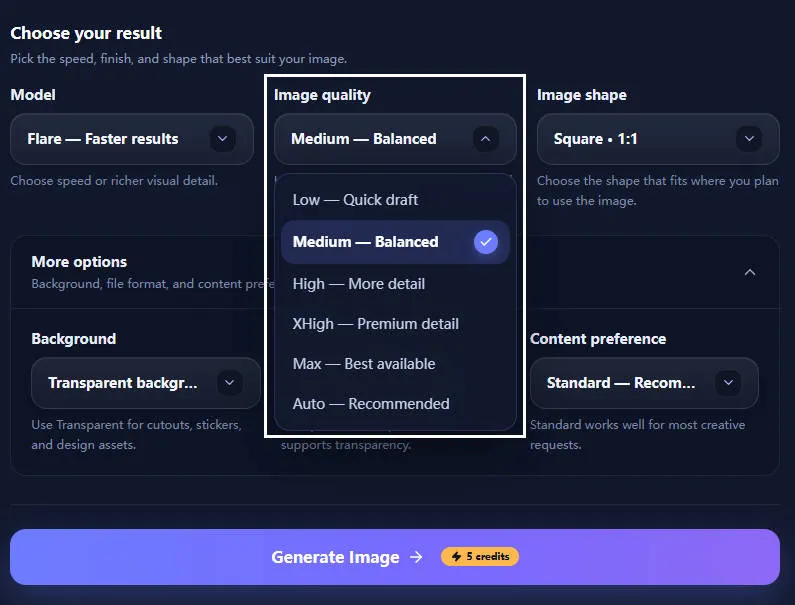
Quality controls the rendering level; resolution controls the pixel dimensions. Two images can both measure 1024 × 1024 pixels while using different quality settings.
Selecting Max does not automatically produce a 4K image. Likewise, choosing a larger image size does not guarantee that the composition, text, or subject details will be correct.
When Is Higher Quality Worth Trying?
Compare higher settings when the overall direction works but important details still need attention:
Portraits: Inspect hair, skin texture, clothing, and natural facial detail.
Product visuals: Check edges, reflections, materials, and small structural features.
Promotional graphics: Review lettering, spacing, and readability at the intended display size.
These are useful evaluation points, not guaranteed improvements. For GPT Image 2.5 quality comparisons, keep the model, prompt, reference images, and output dimensions unchanged so you can better assess the setting itself.
Refine the Brief Before Raising the Quality
If the subject is misplaced or the wrong object changes, clarify the instructions first. A higher rendering setting does not replace a clear request.
For example, replace “make this product image better” with:
"Improve the glass reflections and metal texture. Keep the product shape, label, camera angle, and background unchanged."
Save your preferred version before continuing. If you want to refine that specific image, use it as an input; raising quality on a new generation does not simply sharpen the previous result.
GPT Image 2.5 Transparent Backgrounds: Create Reusable Assets
Generate images that fit into your next design.
Both Flare and Sunburst support transparent backgrounds, making them useful for product cutouts, stickers, icons, and other assets you want to place over an existing layout.
Transparency removes the need for a fixed background, giving you more flexibility when building a website banner, presentation, or promotional graphic.
Choose Transparent Background and a Compatible Format
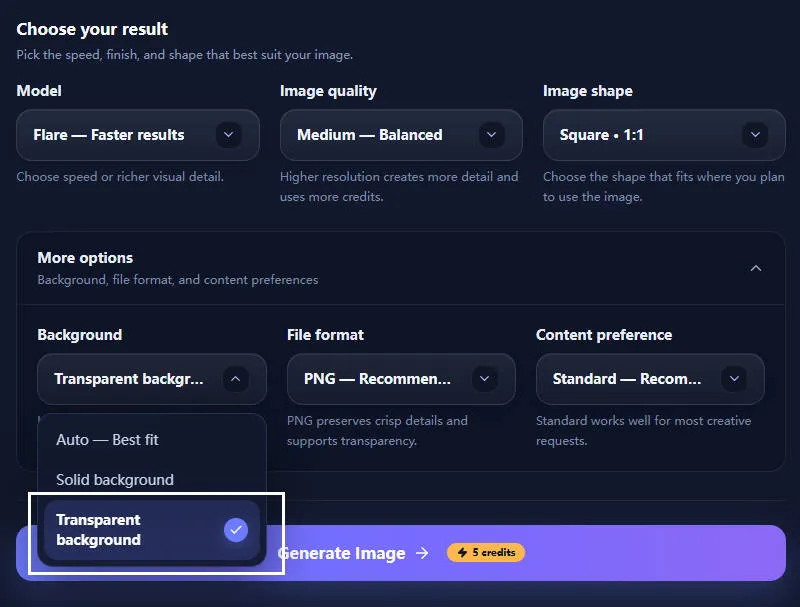
For GPT Image 2.5 transparent output, select Transparent in the background settings and use PNG or WebP. JPEG cannot preserve transparency. PNG is a straightforward choice for assets you plan to reuse in design tools. These format requirements are covered in the output settings guide.
Describe the isolated subject clearly. For example:
Create a front-facing ceramic coffee cup on a transparent background. Keep the entire cup visible, with clean edges and no surrounding scenery or ground shadow.
For an existing product photo, specify that the background should be removed while the product’s shape, label, and colors remain unchanged.
Check the Asset Before Reusing It
A transparent setting still requires visual review. Place the exported image over both a light and a dark background, then inspect:
Edges: Look for halos, rough outlines, or leftover background.
Fine details: Check hair, fur, thin handles, and small openings.
Translucent materials: Examine glass and partially transparent surfaces.
Framing: Make sure the subject is complete and has enough space around it.
A white background is not the same as transparency. If the downloaded image appears white, test it over a colored layer in your design tool to confirm whether the background is actually transparent.
Keep Cutouts Separate from Finished Scenes
Use transparent output when the subject needs to move between layouts. If you want an atmospheric product photograph with a surface, shadows, and background lighting, an opaque scene may better match the brief.
For AI product cutouts and transparent design assets, decide how the image will be placed before generating. This makes it easier to request suitable framing and avoid unwanted scenery.
Choose a Model for Your Creative Task
Match the model to the work you need to finish.
The following are practical starting suggestions based on the models’ positioning, rather than measured rankings for individual tasks.
Campaign Concepts and Social Content
Consider GPT Image 2.5 Flare for marketing images when you are exploring layouts, palettes, or visual styles. A campaign might need an editorial direction, a playful illustration, and a minimal product composition before anyone chooses a final approach.
In this stage, faster iteration helps you explore alternatives. A strong Flare result may already meet your needs; changing models is optional.
Product and Portrait Refinement
Consider GPT Image 2.5 Sunburst image editing when you already like the image and need a controlled revision. Examples include changing a bottle cap’s material while preserving its label, or adjusting a portrait’s clothing while keeping the person recognizable.
Here, success includes both the requested change and the details that should remain. This makes editing precision a more relevant priority than exploring many unrelated versions.
Text-Heavy Designs and Structured Visuals
Ads with headlines, infographics, and interface concepts combine several constraints: content, hierarchy, spacing, and visual style. Sunburst is worth considering when meeting those requirements is central to the task.
For GPT Image 2.5 text in images, readable lettering and accurate placement still require review. Neither model guarantees correct spelling, factual information, or perfect layout.
Explore GPT-Image-2.5 Prompt Guide
Put your next creative brief to work.
You can try GPT Image 2.5 Flare and Sunburst online without setting up an API integration:
Choose your mode. Use Text to Image for a new visual or Image to Image for reference-based creation and edits.
Select your model and add your brief. Choose Flare or Sunburst, enter your prompt, and upload any required reference images.
Set the output. Choose quality, image shape, background, and file format for your intended use.
Review the credits and generate. Check the displayed cost, then inspect the output against your requirements.
New accounts currently receive 5 free credits—enough for one Medium-quality image or up to two Low-quality images under the current site rules.
Start with one specific task: a visual concept, a product revision, or a new portrait setting. Choose the model around that goal, and keep the result that best serves your project.
GPT Image 2.5 Flare and Sunburst FAQs
Can I use an image generated with Flare as input for Sunburst?
Yes. Save the Flare output and upload it as an image input when using Sunburst. Describe the revision you want. Switching models alone does not guarantee an improvement.
Do I need API access to use Flare or Sunburst on this website?
No. The website provides the generation interface. You do not need to supply an API key or write code to create images here.
Does choosing Max guarantee a better result?
No. Max is a quality setting, not a guarantee that the image will better match your intent. Clear requirements and suitable references remain important, and a lower setting may already be sufficient for your use.
Can either model guarantee an exact match to my reference?
No. Reference-based generation and editing can still alter details. Check important features such as faces, product proportions, and branding before approving the result.